Your first routing rollout
Configure two model tiers, preview routing on live traffic, check cost and answer quality, then turn routing on.
On this page
On the previous page, TokenTriage priced a live request without changing its response. In this tutorial, you’ll add a cheaper model, preview which requests would use it, check the cost and answer quality, and then turn routing on.
You’ll use two model tiers and one rule: simple requests go to the cheaper tier, while everything else stays on the more capable tier. Until the final step, your application keeps receiving responses from the model it requested.
Before you start
You need:
- TokenTriage installed and the proxy from the previous tutorial stopped.
- An
ANTHROPIC_API_KEYwith access to Claude Haiku 4.5 and Claude Sonnet 4.6. - A few representative test requests. The quality check later needs at least 30 requests for which both model answers receive a grade.
You can inspect a shadow decision after the first request. Reaching a quality verdict takes longer and depends on your traffic volume and sampling rate. The quality check makes additional provider calls; you’ll put a daily dollar cap on those calls before enabling it.
Using another provider? Substitute its upstream and two models below, then continue with the same steps. See Providers for the available upstream shapes.
1. Save a two-tier configuration
Create tokentriage.yaml in your working directory:
version: 1
mode: shadow

server:
  listen: "127.0.0.1:8787"
  admin: "127.0.0.1:9090"

upstreams:
  anthropic:
    base_url: https://api.anthropic.com
    dialect: anthropic
    api_key_env: ANTHROPIC_API_KEY

tiers: # ordered from cheapest to most capable
  - name: cheap
    upstream: anthropic
    model: claude-haiku-4-5
  - name: frontier
    upstream: anthropic
    model: claude-sonnet-4-6

routing:
  default_tier: frontier
  policy:
    version: 1
    params:
      simple_cut:
        value: 0.35
        calibrate: { signal: complexity, direction: below }
    root:
      rules:
        - id: simple-to-cheap
          when: "signal.complexity < $simple_cut"
          to: { tier: cheap }
      default: { tier: frontier }

ledger:
  decision_log:
    path: ~/.tokentriage/routing-tutorial.jsonl

dashboard:
  enabled: true
  auth:
    mode: off # allowed because the admin address is loopback-only
A tier is a routing destination: an upstream plus the model it serves. The policy checks
the built-in complexity score. Requests below 0.35 match simple-to-cheap; requests that do
not match use frontier.
The threshold is a starting point, not a universal definition of a simple prompt. Keep it for this walkthrough, then calibrate it from your own traffic.
2. Validate and start in shadow mode
Validate the file before starting the proxy:
$ tokentriage validate --config tokentriage.yamlThe command should finish with OK: configuration is valid. It catches unknown fields,
missing defaults, and references to tiers or upstreams that do not exist.
Now start the proxy:
$ tokentriage run --config tokentriage.yamlKeep it running and send traffic to http://127.0.0.1:8787, as you did in the previous
tutorial. Use both short prompts and prompts that require several steps so you can see both
branches of the policy.
Need a sample request?
This sends a short prompt through the Anthropic endpoint:
$ curl -s -i http://127.0.0.1:8787/v1/messages \
  -H "Content-Type: application/json" \
  -H "x-api-key: $ANTHROPIC_API_KEY" \
  -H "anthropic-version: 2023-06-01" \
  -d '{"model":"claude-sonnet-4-6","max_tokens":32,
       "messages":[{"role":"user","content":"Reply with one word: hello"}]}'
On PowerShell, call curl.exe, use backticks for line continuation, and write the key as
$env:ANTHROPIC_API_KEY.
3. Inspect one previewed decision
Copy the x-tt-request-id response header from one request, then explain its routing decision:
$ tokentriage policy explain --req-id <request-id> \
    --log ~/.tokentriage/routing-tutorial.jsonl
req_id:     <request-id>
decision:   rule=simple-to-cheap tier=cheap upstream=anthropic model_rewrite=claude-sonnet-4-6→claude-haiku-4-5
path:       root → rules[simple-to-cheap]
trace:
  • rules[simple-to-cheap]       matched
      read signal.complexity = 0.21
      read $simple_cut = 0.35
This says the rule matched and would choose Haiku. Because the proxy is in shadow mode, the
client still received the Sonnet response it requested. TokenTriage recorded the preview in the
ledger without applying it.
If the output names default and frontier instead, that request did not fall below the
threshold. Send a shorter prompt, or inspect the complexity value before changing the policy.
4. Estimate the saving
After you have sent a small batch of traffic, total the previewed decisions:
$ tokentriage report --log ~/.tokentriage/routing-tutorial.jsonlRead these lines first:
routed rowstells you how many requests had both a routing decision and enough pricing data for the comparison.not-routing spendis what those requests would cost on the most capable tier.routed spendis what the selected tiers would cost.savingsis the difference for those routed rows, not for every request in the ledger.
Then find simple-to-cheap under BY RULE. That row isolates the requests your one rule moved.
The exact amounts depend on your prompts, token counts, and pricing snapshot.
Before duplication is enabled, the report’s first line may say that quality cannot be measured. That is expected. Read the cost totals for now; the next step adds the missing quality evidence.
This report answers a cost question only. A cheaper answer that is worse is not a useful saving,
so check answer quality before changing the mode to route.
5. Check both models on the same requests
To compare answer quality, TokenTriage needs to grade both roads: the model selected by the policy and the model it did not select. Shadow duplication sends sampled requests to that other tier off the client path, then uses a judge to grade both answers.
Add these blocks to tokentriage.yaml:
classifier:
  oracle:
    enabled: true
    provider: anthropic
    model: claude-haiku-4-5
    api_key_env: ANTHROPIC_API_KEY
    sample_rate: 0.0 # the duplication workflow invokes this judge

shadow:
  duplicate:
    enabled: true
    sample_rate: 1.0 # useful for a small test batch; lower this for normal traffic
    max_usd_per_day: 1.00 # stops new duplicate work when the cap is reached
judge: oraclePress Ctrl-C in the proxy terminal, validate the updated file, restart, and send at least 30
varied test requests. Some grades can be undecided, so you may need more than 30 requests to
reach 30 decided pairs. If the daily cap stops sampling first, keep the proxy in shadow. Wait
for the next cap window, or review the expected spend before raising the cap.
Then run:
$ tokentriage eval --quality shadow \
    --log ~/.tokentriage/routing-tutorial.jsonl
The first line tells you what to do next:
routing BEATS zero-routermeans the routing policy produced better answers than blindly mixing the same models at the same average cost. Continue to the final step.routing does NOT beat zero-routermeans stay in shadow and adjust the policy, models, or threshold.CANNOT_MEASUREorinsufficient labelsmeans the run does not yet have enough usable pairs. The verdict explains the missing evidence.
Why ordinary response labels are not enough
A normal request scores only the model that served it. It does not tell you how the other model would have answered the same prompt. Those one-sided labels can describe each model, but they cannot demonstrate that the routing choice added value.
Shadow duplication supplies the missing comparison by grading both answers to the same request. The CLI calls this a counterfactual quality source. The routing evaluation explanation covers the frontier calculation and the other supported quality sources.
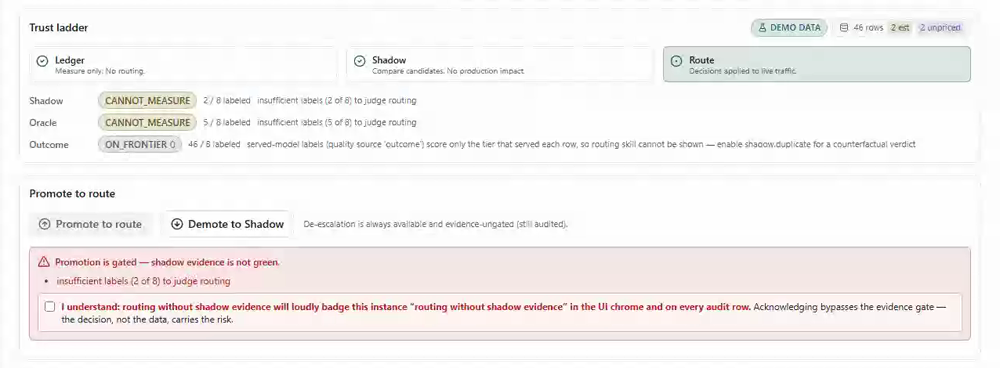
What a blocked promotion looks like
6. Turn routing on
Do this only after the shadow verdict says routing beats the baseline. Change one line:
mode: routeDo not change the policy or tier definitions between the evaluation and promotion. TokenTriage checks that the evidence is fresh and belongs to the current policy. A policy change creates a new fingerprint and needs a new shadow run.
The 1.0 duplication rate above was for a small test batch. Before sending normal traffic,
lower shadow.duplicate.sample_rate to a rate that fits your monitoring budget. Keep the daily
cap in place.
Validate once more, restart, and send the same short request:
$ tokentriage validate --config tokentriage.yaml
$ tokentriage run --config tokentriage.yaml
The decision that was previously a preview is now applied: a matching request is served by
Haiku, and the x-tt-decision-* response headers identify the selected rule and tier. The ledger
continues recording cost, so top, report, and policy explain work as before.
If the evidence is missing, stale, or belongs to a different policy, dashboard promotion stays
blocked until an operator explicitly acknowledges the override. A direct override is marked
route without shadow evidence in the dashboard and audit rows so it cannot be mistaken for an
evidence-backed promotion.
You now have one complete routing rollout: preview the decision, estimate its cost, compare both answers, and apply the policy only after the evidence supports it.